6.19.2013

Bathroom reveal, part deux

So...not a glamorous room, per se, the "powder room." But...with some fabulous chalk paint and cute accessories, this part of the bathroom went from ick to awesome!

Our first challenge, however, was to actually move the entrance door from one wall to another. The original configuration was, uhhmm... stupid. To open the toilet room door you had to make sure the swing out shower door was not also open, and vice versa. Hence, the brilliant plan to move the toilet room door to the wall facing the vanity instead.

Of course, that involved demolition! :) At one point after purchasing it, I asked the hubs, "What will we ever need a 12-lb sledgehammer for?" Answer: knocking the %$#*@ out of drywall. It is FUN!

Just make sure there is nothing you want to keep (say, plumbing or electrical connections) in the wall you are annihilating.

This pic from Pinterest was my inspiration for converting this sad, closet-sized room to something much bigger, bolder, brighter!


The "before" interior of the toilet room, with some chalk paint as a test color:

Dear previous homeowners: really? brown, of all colors?


I did not think to take pics of the demo'd wall but here is the framed-in result:

Old door and wall section removed, framed-in for new wall...(and more paint)
Insulation was added for sound proofing

To allow for more light into the teeny, tiny, little, itty-bitty room we choose to replace the builder grade, hollow-core door with one that featured an opaque glass insert...


Satin nickel Deco-styled doorknob detail


We went with hardwood floors in both the vanity area and powder room (risky, I know, but it looks FABULOUSSS, darling!)


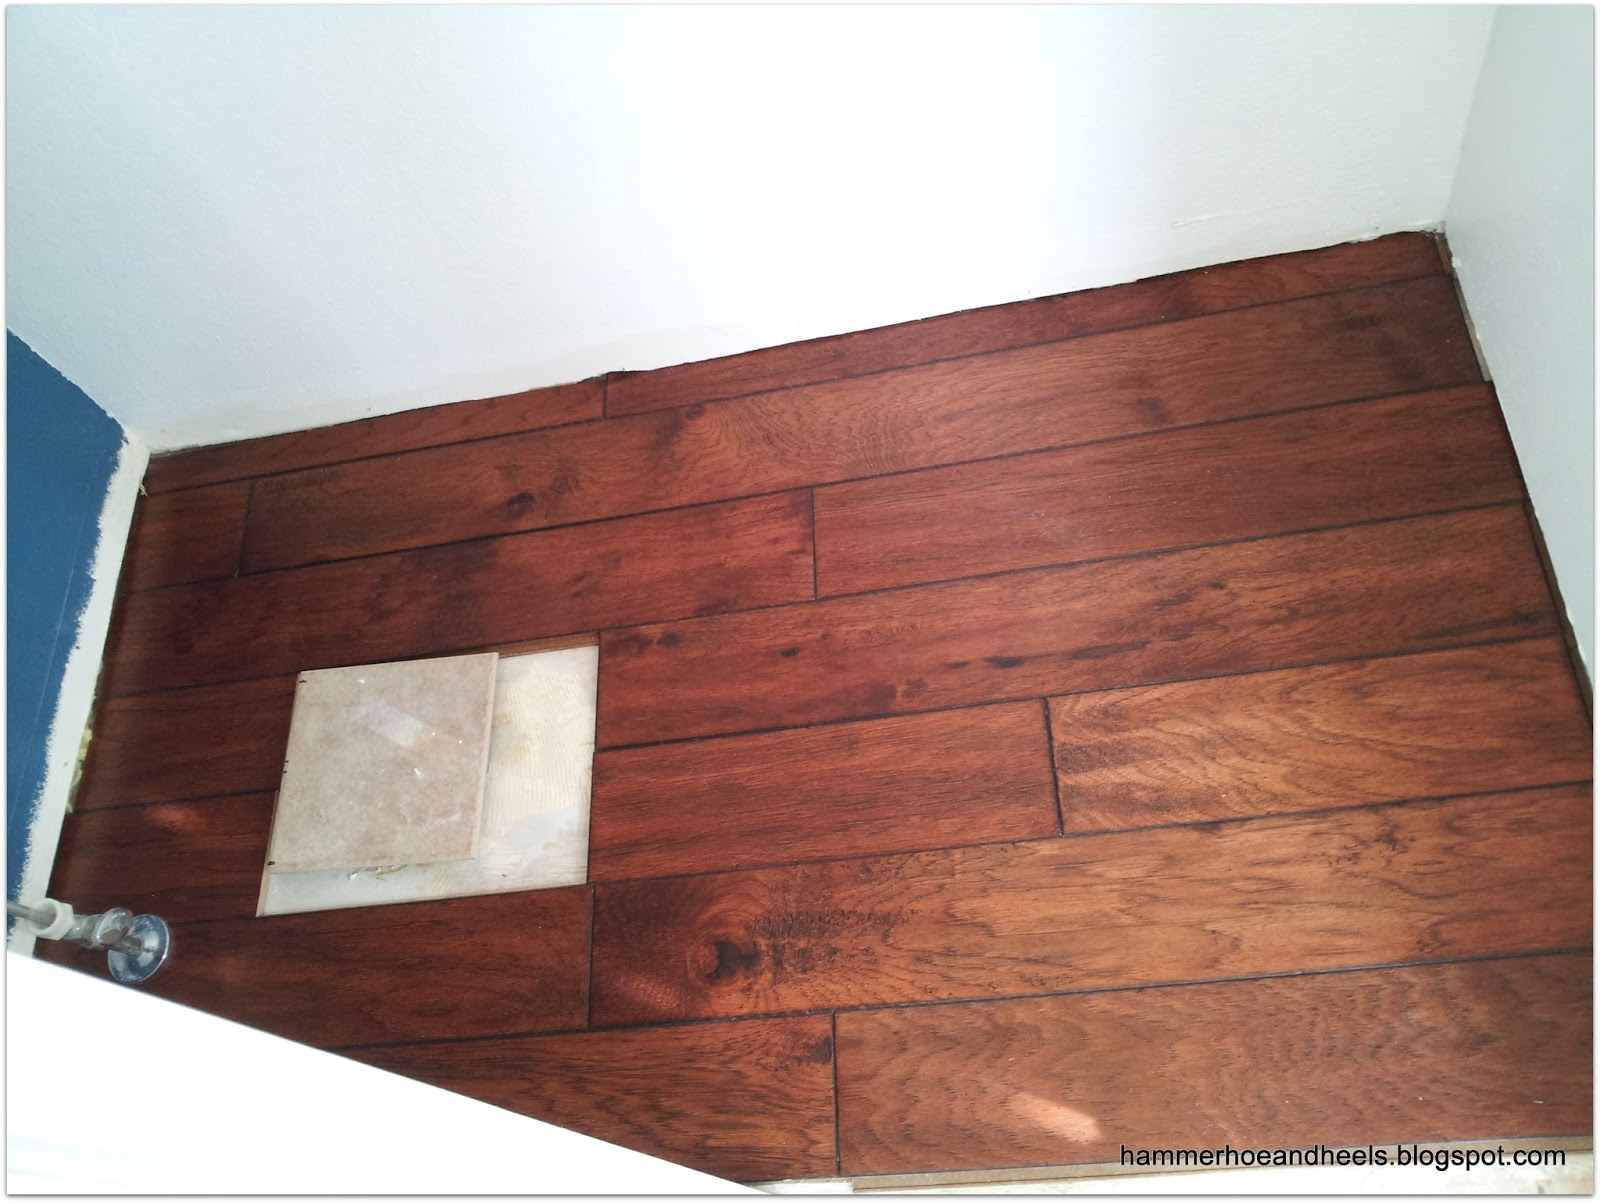
To keep to the Art Deco feel of the remodel, we chose a toilet with angular lines and tiered detailing. Unlike the one pictured above, this one did not cost $500+ (yikes!).


I wanted storage in this ever so petite room so some white shelves were added, along with some cute accessories, for a finishing touch. The wall paint color is Annie Sloan Aubusson Blue.


And there you have it: a powder room that went from boring brown to beautifully bright blue!

The $ Breakdown:

Fabulous Finds
Faux book $7
White shelves $20/ea
 
Splurges
Hardwood flooring $375
Dual flush toilet $170


Tune in for the next installment, the shower from...err...Hades ;)


Tori

6.02.2013

There's a bloom in the bucket...

What can you do with an hour, some flowers and two coal scuttles?

Why, something like this!


This weekend found me at my annual exodus to the Paris Street Market. My gal pal and I descended on the tented wares at the much coffee-inducing hour of 7am in order to score the best goodies ahead of the horde. She was on the hunt for some rusty garden sculptures and I had my eyes peeled for an antiqued mirrored tray to complete the bath vanity area.
  
Although such a tray eluded my grasp, I stumbled upon these anachronistic beauties at two different vendor booths..
 
  
I've had this idea in mind for a while - to use coal scuttles as quirky planters to flank the front door. It seemed that I was to be back in the garden this weekend. Oh darn.
 
With a quick trip to grab some potting soil and bloomin' blossoms, I was ready to go a-plantin'. I just filled the scuttles with soil, transferred violets, petunias, pansies, and bacopa between them and, wallah!


Even our pooch, Ginger, joined the fun..


And since it has been a weekend of planting blooms, here are some of the garden's other debutantes..
 
Always love the combination of purple and orange in the blue window box


Blue Jazz Petunias


A newcomer this year, Black-eyed Susan Vine


So, if you have a just little bit of time, coal scuttles (or any other fun planter), then go put a bloom in a bucket!

Have Fun!

Tori

Sharing with FuNKY JuNK InTeRiors 


5.21.2013

Duckling to Deco, bath remodel no.1

A Vintage Inspired Vanity

 
So, as promised, here are the details for the bath remodel. Look for each area of the remodel posted as its own installment.
 
The master bath has needed updating since we bought the house three years previously. Although serviceable, it was builder blah and boring.
 
As I mentioned in this post, the vanity was originally a lumbering and outdated buffet that I found a local re-sale store. Its graceful serpentine front and abundant storage made it a perfect candidate for a master vanity, however. Thankfully, I could see past the ugly duckling exterior to the art deco details hidden under the hideous application of varnish.
 
Since I wanted a 1920s styled bath, this piece was a perfect fit. And, with a 25% discount off the original price of $185, it was a done deal for sure!


Comparing the vanity color with the marble and tile accents

Yikes! Overdone varnish and chipped veneer


A hearty sanding reveals the beauty of the veneer beneath
 

Marble inserts removed and frame painted


Vanity area before:

 The hubs hated the light fixture and I couldn't tolerate the builder grade press board a minute longer (not to mention those wall colors...egad).


And the ugly gets uglier once fixtures are removed


The existing drywall was cut for the addition of two electrical boxes for lights


And after paint, plumbing, and planks....the NEW vanity area:


Vigo Faucet


I fell in love with these classically vintage shut-off valves and had to incorporate them into the design..along with the exposed copper pipe to the side of the vanity they add an industrial touch to the bath.


The $ breakdown: 

 Fabulous Finds
Buffet $139
Picture $10
Vintage Hardware $18
 
Splurges
Mirrors $225/each
Faucets $65/each
Shut off valves $65/set
Sinks $80/each
Lights $275/all
 

Next reveal installment: The water closet area

 
Sharing with


Tori


4.04.2013

Dr. Livingstone, I presume?

Hello from the wilds of the remodeling jungle!

Egad, I had no idea what lay ahead of me last July when I so presumptively said, "It's time to remodel the master bath."

Let's back up a step - it all started with rum (as any great story must). Whilst the hubs was on travel last summer, there I was - unsupervised - with access to rum, a credit card, and the internet. Just as one should not drive while under the influence, neither should one make alcohol induced decisions to order Restoration Hardware mirrors in the "if you buy them, the remodel will become" vein of thought. Yet, armed with Captain and courage, I hit 'purchase' and the great adventure began.

Having slashed into the jungle of a remodel with that brash mirror purchase, my brain lept straight toward a vanity. Given how wonderfully inspired I was by this pic I found on Pinterest from Whimsical Perspective's website,

www.whimsicalperspective.com


I was über excited to find this buffet at a local re-sale store:


Quite the find, eh? Note the hideous hardware, the dated finish, and just look at those trendy marble inserts! Surely you can see the evil genius of my selection. Not so much?

Ah, then check out those gorgeously sculpted lines, the art deco relief detailing and the convenience of being able to pop out the two marble inserts and have it be instantly ready for vessel sink plumbing. Which leads me back to that sneak peak that I posted many moons ago:


I went immediately to work on removing the hardware and stripping the thick and poorly applied varnish in order to get down to the bare wood.


Extra hardware holes and gaps in the veneer were filled in with a wood filler . Annie Sloan Chalk Paint in Aubusson was chosen for the final color and I attached antique brass pulls (found on Etsy) to mirror the round detailing in the drawers and doors.

At the 90% complete stage
Next to add are the vessel sinks and additional drawer hardware. I am also distressing the wood to have it reflect the vintage/industrial vibe that will be the decor style for the room. Want to see more?
 

Coming soon: the final bathroom reveal!

 
Check back soon to see the entire project in its completion. The infamous mirrors that started it all, the demo, helpful tips on keeping a marriage (and various body parts) intact throughout a remodel, and how to do it all for under $7,500! 
 
Now where did I put that blowtorch...
Tori


7.30.2012

To market, to market....


So, summer has been chock full of activity. Relatives from Florida visiting, rose gardens being overhauled, new paths added and, best of all, fun with flea market finds! I thought I would share some of the cool items that just had to come home with me so far this summer...


Can you believe I found this beautiful vintage sewing machine for the absolute STEAL of $20?! Neither did I. I even double checked that the tag wasn't missing a zero. Lucky me!


Or how about an old-fashioned ice cream parlor stool for the drool-worthy bargain of $22? It still spins like a dream and is the perfect side table to the newly painted garden bench (or as the occasional photo prop).


This petite darling is headed back to Florida with my mother - just the right size for watering her blue daze vine in its birdcage planter...


A vintage scale and iron bee napkin rings were impossible to resist...


I'll be sharing more soon on my largest summer project. In the meantime, here is a sneak peak..


More to come soon...


6.17.2012

From shabby to chic...

Have a garden bench that needs some TLC? Join the masses...

When the hubs and I wanted to fill an empty front porch space, we trooped off to one of the home improvement stores and brought back a standard park bench. We added a few hanging plants and, presto, instant atmosphere. Fast forward five years, a different porch (one that was open rather than covered), and lots of abusive weather later and you have a poor bench that needs some love.

I stumbled upon a darling picture on Shabby Soul's  fabulous blog and an idea was born. Rather than an all over lilac as featured in Sylvia's blog, I opted for a sage and lilac combination (mostly because I feared my husband would refuse to sit on something so entirely pastel).

After moving the bench into the garage for disassembly, I sanded down the wood slats with my trusty orbital sander. (I have to say, there is something infinitely satisfying in watching old paint or stain give way to the brute force of spinning grit.) Previous homeowners had left behind a tiny quart of the most serendipitous can of paint that I have ever come across. I have used it on the secret garden door featured in this post, on this sadly neglected bench and on the newly renovated arbor (more on that project in a future post).

Before
Before

After spray painting the metal side frames with some Rust-Oleum in French Lilac, I let everything dry overnight. The wood slats got a quick coat of polyurethane and all was reassembled.

TA DAAAA...


Amazing, is it not, what a little TLC can accomplish? Now we can sit on our ever-so-chic new bench and I can show off my equally chic new summer sandals...


Fahrenheit Iplay Espadrille


Sharing with:

Have fun with YOUR garden bench...